DIY Wall Art: Creative Ideas for Personalized Decor

DIY Wall Art: Creative Ideas for Personalized Decor

Walls are your home’s largest blank canvas—and they’re perfect for expressing your personality. Whether you’re renting, decorating on a budget, or simply craving a creative outlet, DIY wall art can transform a room with color, texture, and story. Below you’ll find project ideas for every skill level, plus practical tips for planning, hanging, and styling your art like a pro.

Plan Before You Paint (or Paste)

Measure Your Space and Define Scale

Size matters. Large walls benefit from bold, oversized pieces or cohesive gallery grids, while smaller nooks shine with vertical formats or sets of two to three smaller works. As a guide, aim for artwork that’s 2/3 to 3/4 the width of the furniture it hangs above.

Choose a Color Story

Pick a palette of 3–5 colors based on your room’s existing textiles, rug, or a favorite object. Repeat these hues throughout your art to create cohesion. If in doubt, use a base of neutrals with one accent color for impact.

Gather Tools and Materials

  • Basics: tape measure, pencil, level, painter’s tape, scissors
  • Hanging: wall anchors, picture hooks, removable strips for renters
  • Surfaces: canvas, wood panels, foam board, heavy paper, fabric
  • Finishes: frames, washi tape, bulldog clips, floating frames

Safety and Practical Tips

  • Ventilate when using paints, sprays, or adhesives; choose low-VOC where possible.
  • Use appropriate anchors for heavy or 3D pieces and check the wall type (drywall, brick, plaster).
  • Wear a mask and gloves when sanding, cutting wood, or using resin/solvents.

Creative DIY Wall Art Ideas

1) Geometric Tape Art

Create crisp, modern patterns using painter’s tape for clean lines and color blocking.

Geometric tape art with bold color blocks on a wall
Painter’s tape makes it easy to craft sharp, dynamic shapes.

Materials

  • Painter’s tape (various widths)
  • Acrylic wall paint or craft paint
  • Canvas, wood panel, or directly on wall

Steps

  1. Sketch a rough layout. Tape off sections to form triangles, stripes, or chevrons.
  2. Paint within the taped areas; vary tones for depth.
  3. Remove tape while paint is slightly damp for the cleanest edges.

Tip: Use a monochrome palette for a calm look, or combine one bold color with two muted tones.

2) Pressed Botanicals in Floating Frames

Bring nature indoors with dried leaves, ferns, or blooms arranged between glass panes.

Materials

  • Fresh botanicals (pressed for 1–2 weeks in books or a press)
  • Floating frames or double-glass frames
  • Acid-free adhesive dots

Steps

  1. Press and fully dry botanicals to avoid moisture damage.
  2. Arrange on glass, securing with minimal adhesive.
  3. Close the frame and hang in indirect light to preserve color.

Variation: Label specimens with handwritten tags for a botanical-study vibe.

3) Upcycled Fabric Panels or Mini Quilts

Turn fabric scraps or old clothing into textured wall art that tells a story.

Materials

  • Fabric remnants or thrifted textiles
  • Canvas stretcher bars or foam board
  • Staple gun or fabric glue

Steps

  1. Cut fabric slightly larger than the frame or board.
  2. Pull taut and staple or glue to the back.
  3. Arrange multiple panels in a grid for a gallery effect.

Tip: Mix textures—linen, velvet, and denim—for depth.

4) Typographic Statement Art

Bold letters or a meaningful quote can anchor a room and reflect your values.

Materials

  • Stencil or vinyl letters
  • Canvas or painted board
  • Acrylic paint or paint marker

Steps

  1. Mark a baseline with a level.
  2. Apply stencil or vinyl; paint and peel.
  3. Seal with a matte varnish if desired.

Variation: Use metallic paint for a subtle glow.

5) Photo Grid with Cohesive Frames

Transform family photos or travel shots into a sleek, gallery-style installation.

Materials

  • 8–12 matching frames
  • Printed photos (consider black-and-white for unity)
  • Paper templates and painter’s tape

Steps

  1. Cut paper templates to frame size; tape to the wall to plan spacing.
  2. Align the center row at eye level.
  3. Hang frames over the templates for perfect placement.

Tip: Keep spacing consistent—typically 2–3 inches between frames.

6) Mixed-Media Collage on Canvas

Layer paper, fabric, and paint for tactile, one-of-a-kind compositions.

Materials

  • Canvas or panel
  • Scrap paper, magazine clippings, tissue, fabric
  • Matte gel medium, brushes, acrylics

Steps

  1. Prime the surface; create a loose painted background.
  2. Adhere collage elements with gel medium.
  3. Add details with paint markers or stamps; seal when dry.

Tip: Limit your palette to avoid visual clutter.

7) String Art on Wood

Crisp outlines and geometric fills made from nails and colored string.

Materials

  • Wood panel, small nails, hammer
  • Cotton string or embroidery thread
  • Paper template of your design

Steps

  1. Tape template to wood; hammer nails along the outline.
  2. Remove the paper; tie string to a nail and weave across the shape.
  3. Finish with a tight knot and trim.

Note: Pre-drill pilot holes in hardwood to prevent splitting.

8) Shadow Boxes and 3D Curios

Display small objects—shells, vintage keys, postcards—in a dimensional frame.

Materials

  • Shadow box frame
  • Objects, pins, archival tape
  • Background paper or fabric

Steps

  1. Cover the backing with fabric or paper.
  2. Arrange objects; secure with pins or archival adhesive.
  3. Close and mount securely, using anchors for weight.

9) Fluid Art or Alcohol Ink

Create ethereal marbling and color flows. Best done on protected surfaces with good ventilation.

Materials

  • Fluid acrylics or alcohol inks
  • Pouring medium, gloves, drop cloth
  • Non-porous surface (yupo paper, sealed panel)

Steps

  1. Mix paints per product instructions.
  2. Pour, tilt, and manipulate; let dry fully.
  3. Seal to enhance color and protect the surface.

Safety: Use alcohol inks only with proper ventilation and follow manufacturer guidelines.

10) Minimalist Line Art

Elegant, expressive lines created with a single continuous stroke.

Materials

  • Thick paper or canvas
  • Paint marker or sumi ink and brush
  • Optional projector for tracing

Steps

  1. Lightly sketch; then commit to a fluid, confident line.
  2. Embrace imperfections—they add character.
  3. Frame with generous matting for a gallery feel.

11) Map Art with Threads and Pins

Track places you love or dream of visiting with color-coded strings.

Materials

  • Printed map mounted to foam board
  • Map pins, colored thread
  • Ruler, labels

Steps

  1. Mount map; mark key locations.
  2. Pin and connect with thread lines.
  3. Add a legend for meaning and color codes.

12) Removable Wallpaper Panels (Renter-Friendly)

Frame strips of peel-and-stick wallpaper as art for big impact with low commitment.

Materials

  • Peel-and-stick wallpaper
  • Trim molding or poster frames
  • Utility knife, straightedge

Steps

  1. Cut wallpaper to fit frames or molding “panels.”
  2. Mount panels; secure with removable strips.
  3. Arrange as a triptych for balance.

13) Macramé or Fiber Wall Hanging

Add warmth and texture with knotted cotton cords or yarns.

Materials

  • Macramé cord or chunky yarn
  • Wooden dowel or branch
  • Scissors, comb

Steps

  1. Attach cords to a dowel; learn square and lark’s head knots.
  2. Vary lengths and textures for a boho look.
  3. Trim the bottom into a V or asymmetrical edge.

14) Seasonal Clip Rail Gallery

Swap art with the seasons using a simple rail and bulldog clips.

Materials

  • Wood strip or picture ledge
  • Clips, screws, anchors
  • Assorted prints and postcards

Steps

  1. Mount the rail level across the wall.
  2. Attach clips evenly; hang prints.
  3. Rotate artwork regularly for a fresh look.

15) Found Wood and Natural Elements

Use sanded driftwood, branches, or wood slices arranged as a sculptural installation.

Materials

  • Clean, dry wood pieces
  • Clear sealant (optional)
  • Mounting hardware

Steps

  1. Clean and seal wood if desired.
  2. Arrange on the floor before mounting.
  3. Use spacers to create shadows and depth.

Composition and Layout Tips

  • Eye-Level Rule: Aim to hang artwork so the center is about 57–60 inches from the floor, or align with the average eye level in your home.
  • Groupings: Odd numbers often feel more dynamic than even; keep 2–3 inches between pieces in a gallery wall.
  • Balance: Mix sizes—one large anchor piece with smaller supporting works—to avoid a “scattered” look.
  • Negative Space: Allow breathing room; crowded walls feel busy and smaller.
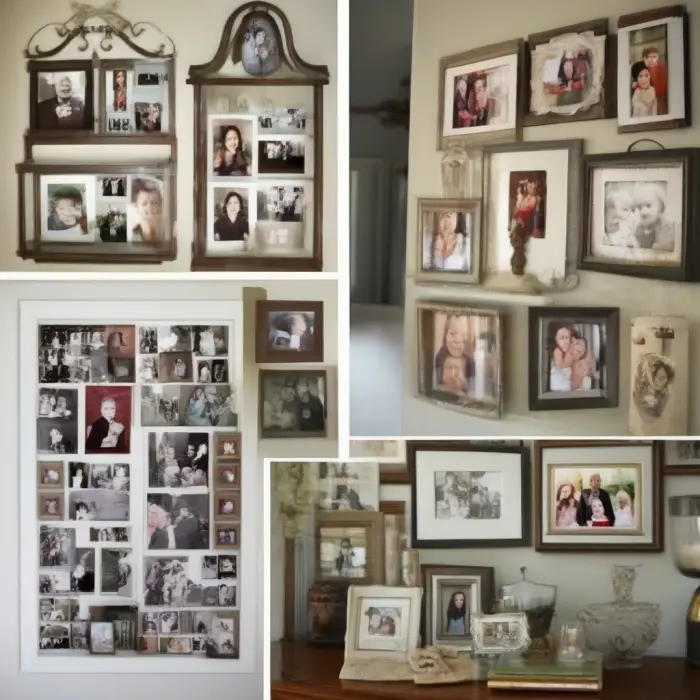
  • Mockups: Use paper templates or painter’s tape to test layouts before drilling.
  • Consistent Framing: Matching frames or mats create cohesion even with varied art styles.

Budget, Sustainability, and Sourcing

  • Thrift and Upcycle: Hunt for frames, textiles, and books at thrift stores; repaint frames for uniformity.
  • Print Smart: Use high-quality paper at home or local print shops; try recycled or cotton rag papers for a fine-art feel.
  • Eco Choices: Choose low-VOC paints, water-based adhesives, and reclaimed wood when possible.
  • Shop Your Home: Repurpose maps, calendars, gift wrap, or fabric offcuts into instant wall decor.

Quick Projects You Can Finish in a Weekend

  • Washi Tape Mural: Outline simple shapes or frames directly on the wall—peels off cleanly.
  • Abstract Color Fields: Large brush, two colors, one afternoon; frame with a thin black or oak frame.
  • Poster + Oversized Mat: Elevate an affordable poster by using a wide mat and clean frame.
  • Tiled Postcards: Grid a set of postcards with matching frames for an instant gallery.

Common Mistakes and How to Fix Them

  • Art Too Small: Combine pieces into a set or add a wide mat to increase visual presence.
  • Crooked Lines: Use a level and mark light pencil guides; switch to sawtooth hangers or two-point hanging.
  • Color Overload: Restrict to a simpler palette; repeat key hues to unify.
  • Damaging Walls: For rentals, use removable strips, lean frames on picture ledges, or choose lightweight substrates.

Final Thoughts

DIY wall art isn’t about perfection—it’s about personality. Start with one piece that excites you, and build a collection over time. Mix textures, play with scale, and don’t shy away from experimenting. The best walls evolve as your life and tastes change, telling your story one frame, fiber, or brushstroke at a time.

© 2025 Your Creative Home. All rights reserved.

Most Read

Healthy Snacking Habits for Nutrient-Rich Choices

Hydration Habits: How Much Water Should You Drink Daily?

The World's Strangest Foods and Where to Find Them

The Strange Love Story of Vincent Cassel